Recurring Invoices and Enabling Autopay
Step 1: Creating a New Recurring Invoice
- In
the blue "New Family Recurring Invoices" button, we can create a new
recurring invoice, following the steps we have already seen in previous
sections. We enter all the required data and click on the "Save" option.
Step 2: Managing the Created Invoice
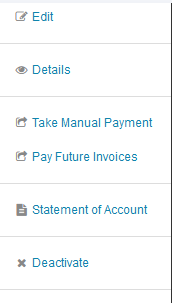
- Once
created and included in the system, it is assigned a status.
Additionally, it enables the "Actions" section where we can take certain
steps with that invoice.

Step 3: Actions. Editing, Manual Payment, Paying Future Invoices, and Deactivating
- Edit: It opens the original invoice in case we need to make any changes.
- Take manual payment:
It allows us to change the status of the invoice from recurring to
normal. With this, we could enter a payment manually. The system will
give us two warning boxes to confirm if we want to make the payment. If
we confirm, it takes us to a normal payment screen, which we analyzed in
the previous section.
- Pay Future Invoices:
This option can be used if the family with a recurring invoice decides
to make a payment for several invoices at the same time. Clicking on it
displays a box with all the recurring invoices. We have the option to
cancel all by checking them or the quantity indicated by the head of the
family, then click on "Pay". It takes us to another confirmation box.
- Deactivate:
This feature allows us to deactivate a recurring invoice so that it
does not continue to generate for the required period. Clicking on the
functionality displays a confirmation box showing the date we are
deactivating it, then click on "Save" to execute the process.
Step 4: Enabling Autopay
- From the recurring invoices module, select the "Not Enrolled" option in the AutoPay section.
- Switch the option to "Enable."
- Once enabled, a box will appear.
- Enter the required AutoPay information into the designated fields.
Video Tutorial
Related Articles
Recurring Invoices and Enabling Autopay
Step 1: Creating a New Recurring Invoice In the blue "New Family Recurring Invoices" button, we can create a new recurring invoice, following the steps we have already seen in previous sections. We enter all the required data and click on the "Save" ...
Enabling AutoPay
ENABLE AUTOPAY Step 1: Accessing AutoPay Settings From the recurring invoices module, select the "Not Enrolled" option in the AutoPay section. Switch the option to "Enable." Step 2: Entering AutoPay Information Once enabled, a box will appear. Enter ...
Recurring Invoice
Step 1: Creating a New Recurring Invoice In the blue "New Family Recurring Invoices" button, we can create a new recurring invoice, following the steps we have already seen in previous sections. We enter all the required data and click on the "Save" ...
Create Recurring Invoices
CREATE RECURRING INVOICES Step 1: Creating a New Recurring Invoice In the blue "New Family Recurring Invoices" button, we can create a new recurring invoice, following the steps we have already seen in previous sections. We enter all the required ...
Bulk Invoices
This guide will help you create bulk invoices for all parents in your institution or a selected group. You can generate different types of invoices, including Monthly Fees, Tuition Fees, or Other Regular Invoices. Step 1: Select Invoice Type Click on ...